វិធីបញ្ចូលអក្សរខ្មែរនៅលើម៉ឺនុយទូរស័ព្ទដែលប្រត្តិបត្តការអែ៑នដ្រយ៍ វគ្គ១
វិធីបញ្ចូលអក្សរខ្មែរនៅលើម៉ឺនុយទូរស័ព្ទដែលប្រត្តិបត្តការអែ៑នដ្រយ៍ វគ្គ១

សួរស្តីអ្នកទាំងអស់គ្នាដែលកំពុងតែទស្សនាអត្ថបទមួយនេះ
ពេលនេះសូមលើកយកវិធីបញ្ចូលលអក្សរខ្មែរនៅលើម៉ឺនុយទូរស័ព្ទដែល
ប្រត្តិបត្តការអែ៑នដ្រយ៍។
សម្រាប់បងប្អូនខ្មែរដែលចូលចិត្តប្រើប្រាស់អក្សរខ្មែរនិងចង់លើកស្ទួយអក្សរខ្មែរដូច
ជនបរទេសមួយចំនួនដែលគេស្រលាញ់ភាសាដែលជាវប្បធម៌របស់គេណាស់ដូចជាជនជាតិ
វៀតណាមហៅយួន ចិន ថៃ ជាដើម។តោះខ្ជិលនិយាយនាំតែឈឺក្បាល។
*មុននឹងអនុវត្តត្រូវប្រាកដថាទូរស័ព្ទរបស់អ្នកបានរូតនិងតម្លើងខ្មែរហ្វុនរួចជាស្រេច
+.ទាញយកតំរូវការមួយចំនួន:
១.ទាញយកApktool V.2.Zip សម្រាប់ win 7 8 vista ប្រភពដើមពី
xda-devoper (ងាយស្រួលមិនបាច់វាយតាមcmdនាំតែស្មុគស្មាញ)
២.Apktool.zip សម្រាប់គ្រប់ pc ប្រភពពីxda-devoper (ប្រើប្រាស់Command Prompt)
៣.Microsoft Powerpacks (តម្លើងដាក់កំព្យូទរ័)
៤.NET framework (តម្លើងដាក់កំព្យូទរ័ប្រសិនប្រើលេខ1)
៥.Java JDK (តម្លើងដាក់កំព្យូទរ័ប្រសិនប្រើលេខ២)
៦.Notpad (តម្លើងដាក់កំព្យូទរ័)
៧.Winrar.(តម្លើងដាក់កំព្យូទរ័)
+តោះអនុវត្តទាំងអស់គ្នា
-ជាដំបូងខ្ញុំសូមលើកកម្មវិធីAndroid Apk Toolដើម្បីធ្វើការ
កែមួយចំនុចគឺការបន្ថែមអក្សរខ្មែរចូលទៅក្នុងsetting.apk
របស់ទូរស័ព្ទប៉ុណ្ណោះ រីឯការកែចំនុចផ្សេងទៀតគឺវាមានរបៀបប្រហាក់ប្រហែលគ្នាដែរទេ។
១.ចំឡងSecsetting.apkយកមកដាក់ក្មុងអង្គចងចាំរបស់ទូស័ព្ទដែលវាស្ថិតក្នុងsystem/app
រួចផ្ទេរពីទូរស័ព្ទដាក់លើDesktopរបស់កំព្យូរទ័របន្ទាប់មកចំឡងទៅដាក់ក្នុងFolder AndroidApktool
២.បើកកម្មវិធីAndroidApktool.exe-->ជ្រើសយកSecsetting.apk-->ចុចពាក្យdecompileរងចាំរហូត
លោតផ្ទាំង១ដែលមានអក្សរ finished check log for error.


៤.បើកFolder SecSettings-->res-->Vaulesចុចលើstrings.xml-->opend with notpad
៥.ធ្វើការកែពីភាសាបរទេសទៅជាភាសាខ្មែររក្សាទុកបន្ទាប់ពីកែ។
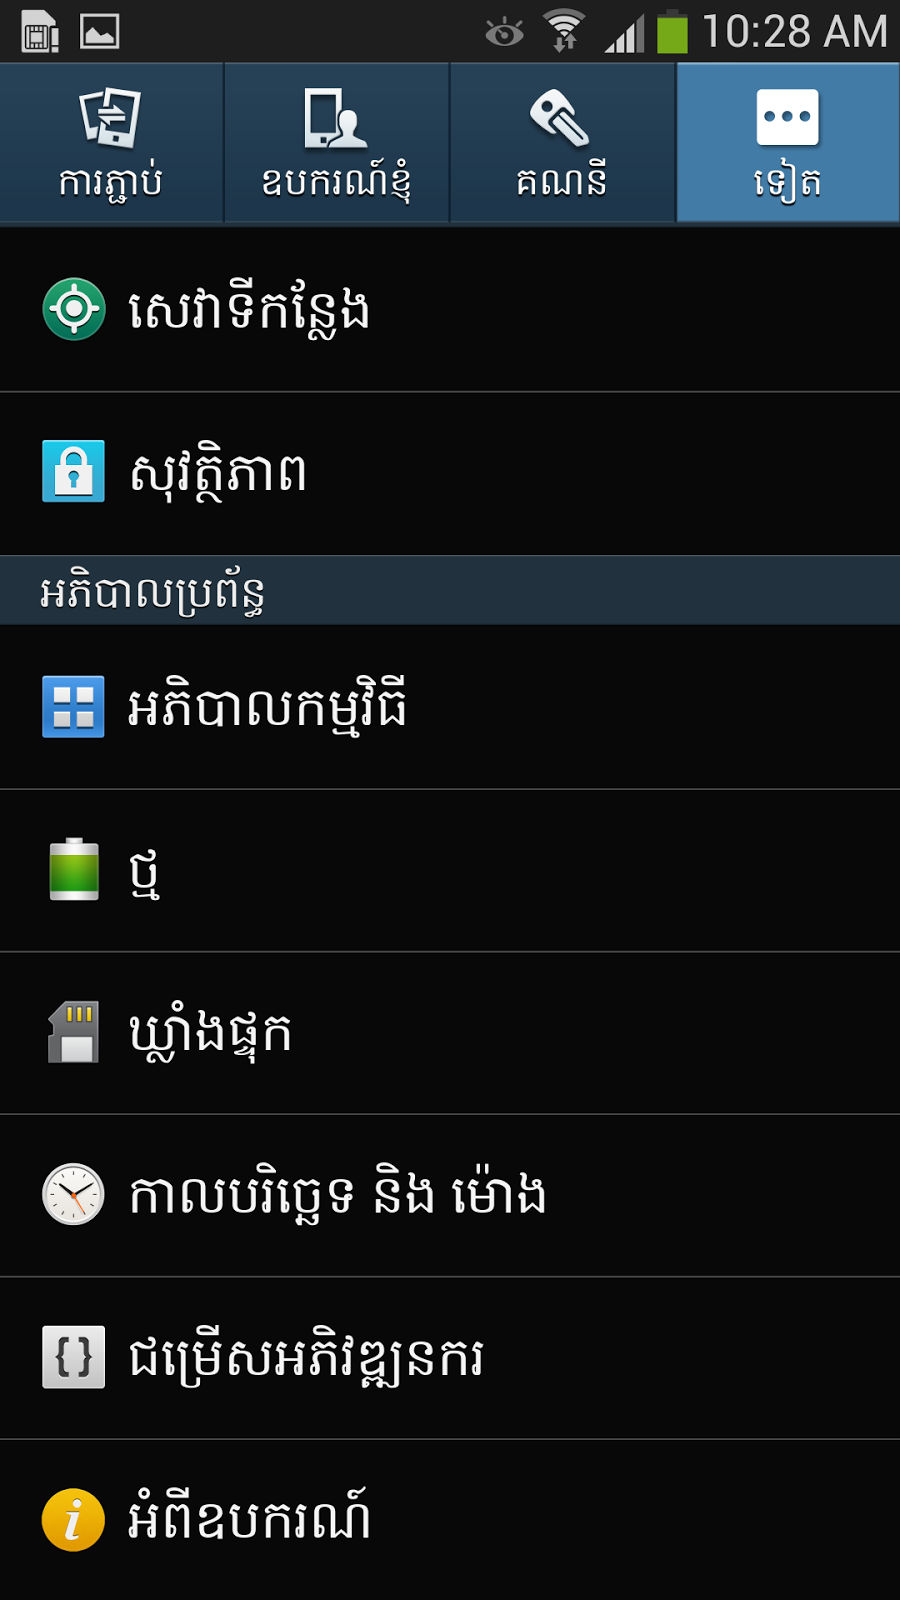
ឧ.ខ្ញុំកែពីអក្សរAbout Device ឲទៅជា អំពីឧបករណ៍។


៨.បើកកម្មវិធីAndroidApktool.exe-->ជ្រើសយកFolder Secsettings-->
ចុចcompileបន្តិចក្រោយមកនឹងលោតផ្ទាំង finished check log for error...សូមពិនិត្យ
មើលនៅក្នុងFolder Secsettings នឹងលេចចេញfolderថ្មី១ទៀតឈ្មោះថាdist។

៩.បើកFolder dist ចុចលើSecSettings.apk-->opend with winrar (new apk)
១០. ត្រលប់ទៅDesktopវិញចុចលើSecSettings.apk-->opend with winrar (old apk)
១១ ទាញAndroidManifest.xmlនិងMETA-INFពី(old apk)ចូលទៅក្នុង (new apk)រើសយកពាក្យstore

១២ ចុងបញ្ចប់គ្រាន់តែចំឡងវាចូលក្នុងទូរស័ព្ទ បន្ទាប់មកប្រើroot explorer រឺ root
broswerដើម្បីចំឡងវាចូលsystem/appដើម្បីផ្លាស់ប្តូរSesetting.apkចាស់របស់ទូរស័ព្ទរីស្តាត
ជាការស្រេច។លទ្ទផលដែលទទួលបានដូចរូបភាពខាងក្រោម:


+អាចមើលវីឌីអូខាងក្រោមបន្ថែមរឺចុចទីនេះ
*សង្ឈឹមអត្តបទនេះអាចជួយលើកស្ទួយអក្សរខ្មែរនិងអាចផ្តល់ផលប្រយោជន៍ដល់មិត្តទាំងអស់គ្នា។
source: http://www.rashv.com/2013/08/blog-post.html
សួរស្តីអ្នកទាំងអស់គ្នាដែលកំពុងតែទស្សនាអត្ថបទមួយនេះ
ពេលនេះសូមលើកយកវិធីបញ្ចូលលអក្សរខ្មែរនៅលើម៉ឺនុយទូរស័ព្ទដែល
ប្រត្តិបត្តការអែ៑នដ្រយ៍។
សម្រាប់បងប្អូនខ្មែរដែលចូលចិត្តប្រើប្រាស់អក្សរខ្មែរនិងចង់លើកស្ទួយអក្សរខ្មែរដូច
ជនបរទេសមួយចំនួនដែលគេស្រលាញ់ភាសាដែលជាវប្បធម៌របស់គេណាស់ដូចជាជនជាតិ
វៀតណាមហៅយួន ចិន ថៃ ជាដើម។តោះខ្ជិលនិយាយនាំតែឈឺក្បាល។
*មុននឹងអនុវត្តត្រូវប្រាកដថាទូរស័ព្ទរបស់អ្នកបានរូតនិងតម្លើងខ្មែរហ្វុនរួចជាស្រេច
+.ទាញយកតំរូវការមួយចំនួន:
១.ទាញយកApktool V.2.Zip សម្រាប់ win 7 8 vista ប្រភពដើមពី
xda-devoper (ងាយស្រួលមិនបាច់វាយតាមcmdនាំតែស្មុគស្មាញ)
២.Apktool.zip សម្រាប់គ្រប់ pc ប្រភពពីxda-devoper (ប្រើប្រាស់Command Prompt)
៣.Microsoft Powerpacks (តម្លើងដាក់កំព្យូទរ័)
៤.NET framework (តម្លើងដាក់កំព្យូទរ័ប្រសិនប្រើលេខ1)
៥.Java JDK (តម្លើងដាក់កំព្យូទរ័ប្រសិនប្រើលេខ២)
៦.Notpad (តម្លើងដាក់កំព្យូទរ័)
៧.Winrar.(តម្លើងដាក់កំព្យូទរ័)
+តោះអនុវត្តទាំងអស់គ្នា
-ជាដំបូងខ្ញុំសូមលើកកម្មវិធីAndroid Apk Toolដើម្បីធ្វើការ
កែមួយចំនុចគឺការបន្ថែមអក្សរខ្មែរចូលទៅក្នុងsetting.apk
របស់ទូរស័ព្ទប៉ុណ្ណោះ រីឯការកែចំនុចផ្សេងទៀតគឺវាមានរបៀបប្រហាក់ប្រហែលគ្នាដែរទេ។
១.ចំឡងSecsetting.apkយកមកដាក់ក្មុងអង្គចងចាំរបស់ទូស័ព្ទដែលវាស្ថិតក្នុងsystem/app
រួចផ្ទេរពីទូរស័ព្ទដាក់លើDesktopរបស់កំព្យូរទ័របន្ទាប់មកចំឡងទៅដាក់ក្នុងFolder AndroidApktool
២.បើកកម្មវិធីAndroidApktool.exe-->ជ្រើសយកSecsetting.apk-->ចុចពាក្យdecompileរងចាំរហូត
លោតផ្ទាំង១ដែលមានអក្សរ finished check log for error.
៤.បើកFolder SecSettings-->res-->Vaulesចុចលើstrings.xml-->opend with notpad
៥.ធ្វើការកែពីភាសាបរទេសទៅជាភាសាខ្មែររក្សាទុកបន្ទាប់ពីកែ។
ឧ.ខ្ញុំកែពីអក្សរAbout Device ឲទៅជា អំពីឧបករណ៍។
៨.បើកកម្មវិធីAndroidApktool.exe-->ជ្រើសយកFolder Secsettings-->
ចុចcompileបន្តិចក្រោយមកនឹងលោតផ្ទាំង finished check log for error...សូមពិនិត្យ
មើលនៅក្នុងFolder Secsettings នឹងលេចចេញfolderថ្មី១ទៀតឈ្មោះថាdist។
៩.បើកFolder dist ចុចលើSecSettings.apk-->opend with winrar (new apk)
១០. ត្រលប់ទៅDesktopវិញចុចលើSecSettings.apk-->opend with winrar (old apk)
១១ ទាញAndroidManifest.xmlនិងMETA-INFពី(old apk)ចូលទៅក្នុង (new apk)រើសយកពាក្យstore
១២ ចុងបញ្ចប់គ្រាន់តែចំឡងវាចូលក្នុងទូរស័ព្ទ បន្ទាប់មកប្រើroot explorer រឺ root
broswerដើម្បីចំឡងវាចូលsystem/appដើម្បីផ្លាស់ប្តូរSesetting.apkចាស់របស់ទូរស័ព្ទរីស្តាត
ជាការស្រេច។លទ្ទផលដែលទទួលបានដូចរូបភាពខាងក្រោម:
+អាចមើលវីឌីអូខាងក្រោមបន្ថែមរឺចុចទីនេះ
*សង្ឈឹមអត្តបទនេះអាចជួយលើកស្ទួយអក្សរខ្មែរនិងអាចផ្តល់ផលប្រយោជន៍ដល់មិត្តទាំងអស់គ្នា។
source: http://www.rashv.com/2013/08/blog-post.html
វិធីបញ្ចូលអក្សរខ្មែរនៅលើម៉ឺនុយទូរស័ព្ទដែលប្រត្តិបត្តការអែ៑នដ្រយ៍ វគ្គ១
https://blogger.googleusercontent.com/img/b/R29vZ2xl/AVvXsEgBKYF6y0Xc9k5HXOihIawC76pU1-An8Q6x4rXtSWGgUpePYVsz1F-1pZCWGxzswh6GtJvX6LvbCPqTzxBUvhEquQluyK9C02gEEU2QCc__MCehAqMvUD4Kz9CB-cI6N2uXj6Oa_4FLCCc/s72-c/2.png


